I'd like to dedicate this topic to Sara, who taught me to cross stitch many years ago as a way to de-stress.
It's easiest to begin on aida cloth, which has very clear holes, doesn't fray as badly as linen, and just provides and easier background for beginning. Once you've mastered the basics, you will probably want to move on to the other fabrics available. The most complete online explanation I've found of fabrics is at the Craftsman's Studio.
You will need to ensure that your chosen pattern and fabric are the right size for each other. Lots of conversion tables are available for this, but I use the one from the Yarn Tree. Your fabric will have a specific number of holes per inch (you can count this directly from the fabric if you don't know) and your pattern will specify how many stitches it is. Use these numbers to determine the finished size of your design on the conversion table. Next, and this is important, add a 2 to 3 inch margin all the way around for finishing!
Now find the center of the fabric by folding the fabric lengthwise and crosswise. The spot in the middle is ... well, the middle. (This really isn't rocket science!) Your chart will mark the middle of your design. To begin, it's easier to stitch from the middle out. You can do this row-by-row, color group by color group, or whatever system is fun for you and allows you to keep track of where you are.
I have always stitched using a hoop. It's how I was taught. (I have ordered a Q-Snap, but it's late in arriving.) When you put your embroidery hoop onto your cloth, do it so the center is showing. The smaller inner hoop goes on the back side of the cloth, and the larger hoop with the screw goes on the front side. Loosen the screw before placing it on the fabric. Be especially careful when putting a hoop on previously stitched areas. Always loosen the screw before removing it from your fabric. Always remove it when you are finished stitching (and move the position of the hoop every few hours when stitching for longer periods to avoid impossible-to-remove wrinkles from the fabric).
Use a shorter length of thread to begin, about 12 inches long. Choose a needle that's not too wide to fit comfortably through your fabric, but that is big enough to allow you to thread it. For regular stitching, I use a blunt tipped needle. I only use a sharp tip for back stitching and adding embellishments.
To start your thread and anchor it, there are lots of possibilities. Avoid making a knot as it can show through, can catch your floss, and can cause other problems. If you have a couple of isolated stitches, however, a knot may be necessary. If you are working on a row or section of the same color, I think the easiest way to do this is to , leave a length dangling on the FRONT side of your fabric (you don't need to tie a knot in the end but I do; it helps hold the tension), carry you needle several holes away and come up, and begin your cross stitching. As you stitch, the excess thread will be covered by your new stitches and will anchor it in place. Snip off the knot or excess thread on the front when you reach it.
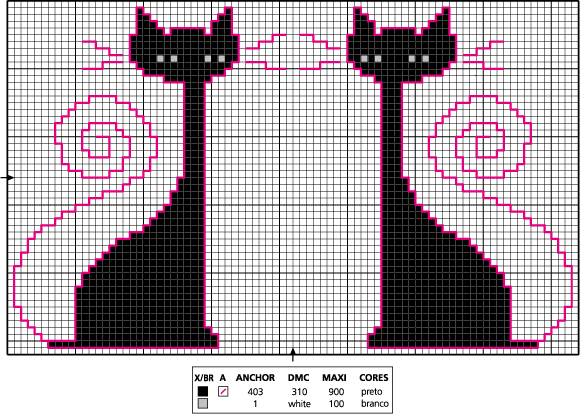
There are two ways you can make the X in a cross stitch. You can make a series of half stiches ///// and then come back over them with the other half \\\\\. This is nice for large areas of the same color, like The Black Cat I recently did. Or you can make an indivicual X each time. This is most useful if you are changing colors a lot or if you are working with overdyed or varigated threads. What is critical is that the top thread of your X (whether it crosses \ or /) always goes in the same direction. Otherwise your work will have an uneven appearance. And relax! That will keep your stitches of an equal tension. Don't pull hard enough to distort the fabric, but do pull firmly enough to keep the thread flat. (This will come naturally very quickly!)
Backstitching and half stitching aren't really beginner-level topics but they aren't that bad either. Back stitching is just 'drawing' around the design as shown in your chart with a different piece of thread. Usually you use only one thread for backstitching, and it's usually a darker color. Half stitches are just half the cross stitch in the direction shown in your chart, either / or \.
To end a thread, pass it under several threads of the same color on the back side of your fabric and snip it off close to where it comes out from under the other stitches. Those little tails of thread tend to pop out on the right side if you aren't careful, but they're easy enough to push back through with your needle.
When your piece is finished, it needs to be ironed. Be certain your iron is on the right setting – what’s sadder than scorching or even melting your work because you forgot to check the setting? Be careful with steam settings as well, as many overdyed threads and cloths will run if they’re wet. Always iron your piece upside-down on a thick towel to prevent flattening your stitches. This will also protect any embellishments (buttons, charms, beads, etc.) you’ve used. If you have a particularly stubborn hoop mark, after you’ve ironed upside-down, turn your project over and carefully iron over the stubborn creases right-side-up. Watch out for those stitches! Iron-flattened cross stitches are not nearly as pretty!
I keep my stitching projects in big Ziploc bags – threads, fabric, even a working copy of my design – to keep them together for easy access and to keep them clean & dry. Especially helpful if you have children or pets!
For best storage of finished projects, UFO’s or WIPs, you should roll the fabric over an acid-free tube of some sort with acid-free tissue paper or cloth around it. However, small projects will fit, flat, in big Ziploc bags and remain clean & safe there for reasonably long periods. This is how I store mine.
The cheapest and easiest way to finish your project is, in my opinion, to make a pillow or ornament. Framing is great if you have the money and access to a reputable framer. Do make sure your framer is using acid-free materials and if you use glass, make sure there are spacers between the glass and the stitched project to avoid moisture build up.
There are other very lovely finishing techniques once you’ve comfortably mastered the basics – pinkeeps and needlerolls, scissor fobs, needle cases, stand-ups and flat-folds, and so much more. There are many online references and classes, books you can purchase, or other blogs you can view. Ash has included wonderfully clear instructions with some of her projects.
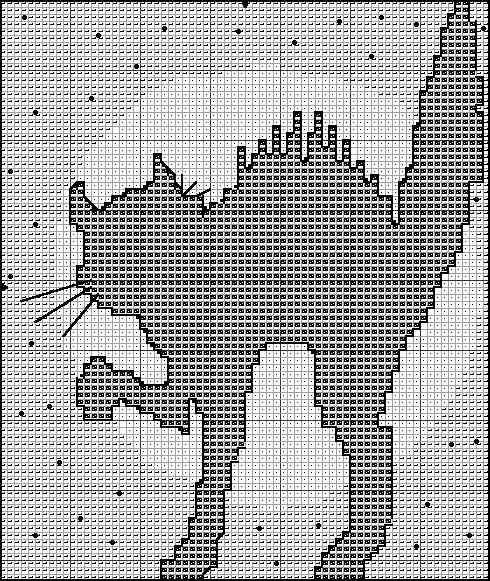
Two beginner's charts (these are internet freebies, and sharing them does not violate any copyright law):